
How to build and upload a React Native app to the iOS App Store using Expo
What is Expo?
Expo is an open-source platform for making universal native apps. React Native is an emerging open-source application development framework launched in 2015 that allows developers to build and deploy applications on web, iOS and Android simultaneously without having to build separate native applications. This combined technology was used by Easie to develop the an analytics app for a client over several releases from 2019 to 2021.
This article provides information and steps on how to publish an application using Expo to the iOS app store.
Prerequisites to build an iOS app
Apple Developer Account. Create an account at developer.Apple.com.
Expo CLI. Documentation for installing Expo CLI.
Github repository or equivalent.
MacOS computer with the Transporter app installed.
Preparing your project
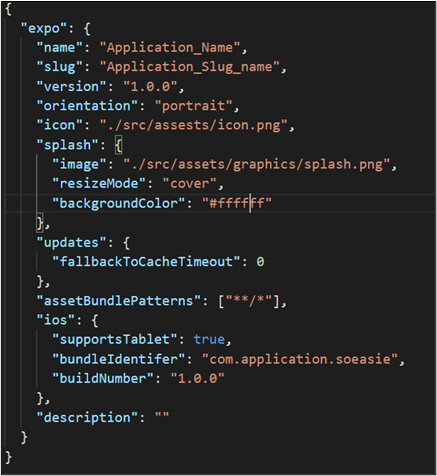
Figure 1 - Prepared App.json file
Prepare the App.json file to ensure settings are correct during building of the file. Note: Expo will return errors if this file is not configured properly.
Basic Expo settings: note that the version must be incremented for each subsequent build upload. The icon value is used to store the app icon. Note: the icon must be 1024x1024 px and NOT transparent.
iOS settings: the “bundleIdentifer” is usually formatted as "com.yourcompany.yourappname" and the buildNumber is used to keep track of versions within an Apple Developer account.
Run the following commands in the terminal once you have navigated to the correct folder where you want to store the build file:
git clone [URL] (downloads repository file).
npm install (installs node modules; this step may require troubleshooting against errors returned in the terminal).
npm start (runs a series of node commands on your project).
Building an .ipa file
Once the application file is set up, you can start building the actual application with Expo as an .ipa (iOS App Store Package) file. The build file can then be uploaded to Apple App Store Connect.
Run this command to start building the iOS file within Expo: expo build:ios
Once that is running, it will ask for access to the Apple account. Type ‘y’ and start building the .ipa file based on the Apple credentials. Note: This step may take up to 45 minutes as the Expo servers build the app.
Once the build is complete, a url is provided to download the .ipa file.
Uploading the app to App Store Connect using Transporter
Download Transporter from the app store (only available on Mac OS) or equivalent. The build file must be uploaded to appstoreconnect.apple.com using transporter. Drop the .ipa file into Transporter and finish the transport process.
The build upload process can be viewed processing within App Store Connect.
Once complete, the application within the build section can be located. Note: Apple will prompt you to complete compliance questions related to encryption for the application.
Adding new app versions
When adding a new build version, ensure that both the version and buildNumber in the app.json are incremented. This ensures that the correct version number for Apple is used and will avoid upload errors.
After updating the app.json with the correct version and buildNumber, follow the same process outlined in this article.
What’s next?
The uploaded application is now ready for either:
Internal testing using TestFlight.
Submission and review by Apple for release to production.
Note: submission to Apple also requires additional information such as a description of the app, screenshots, etc. Apple will determine approval of the app and subsequent upload to production. This process generally takes one to three days.
Easie can help you build your next big project
Schedule a free 15 minute consultation to see how Easie can work for your unique situation.
Do whatever you want 100% of the time.
Citations
This article was edited by Rock W. Vitale.